Ardoberg-Holstein

Ardoberg-Holstein

Thursday, April 11, 2019

Kickin' it Old School

Mike Covell, he who styles himself  King of San Maurice, and I recently got together for an Old School game of Brigadier Peter Young's Charge! We used the excellent Wargames Factory War of Spanish Succession plastic figures, now available from Warlord Games. Mike, commanding the French, had 3 regiments of horse, 4 regiments of  foot, and a battery of guns, while I, leading the English, deployed 2 regiments of horse, 5 regiments of foot and a battery of guns. I actually published this one in our local wargame blog, but I thought you folks would like to see the pics. The only concession we made to modernity was to place the individually based figures on movement trays to save time. I figured Brigadier Young would give us a pass on this. With that small concession we found the game easy and fun, and brought to a conclusion in a reasonable amount of time. Take that, rules written in the 21st Century!
                English regiment of horse enters the fray
                       Two regiments of French horse formed their left flank
 I am an indifferent general and an incompetent photographer
                                   The French center
                   Cavalry engagement on the English right
             French Horse takes out the enemy guns in the center
                   English fire discipline vs French cavalry elan
Old School cavalry dust up


Saturday, September 9, 2017

Close Encounters of the Duck Kind

I got together with Pete today to debug a game I will be hosting at the upcoming wargame event at the National Warplane Museum at Geneseo. The game is called Mars Needs Women! The rules are UFO Squad. The scenario has a landing party of 10 Martians pursuing three Earth women (the Pidgeon sisters) so they can bring them back to their home planet for study. The women flee into the woods on Robertson land. Yes, those Robertsons from the Duck Dynasty show.
Look Phil! Little green Yankees!

The Robertsons spotted the UFO descending into their woods, grabbed their guns and headed out. They were Patriarch Phil, his sons Willy, Allen, Jep and Jase, and Willy's sons John-Luke and Cole. Willy's boys had scoped hunting rifles and the others were armed with assault rifles. As the Robertsons parked their pickup trucks on the trail and started moving into the woods they heard the fleeing women scream. Phil sprinted forward followed more cautiously by most of the others. Jep and Jace stayed close to the trucks. Phil took cover and opened fire on the Martians who had already grabbed two of the fleeing women.
                      Two women captured and one to go!

The unexpected arrival of the Robertsons created a distraction that allowed the third woman to evade her pursuers and eventually make it to the safety of the trucks. The Martians returned fire on Phil, and he was badly wounded. Allen, following close behind also fell, badly wounded by the Martian laser weapons.
             June Pidgeon, the one who got away

Willy's son John Luke took up a position in a copse of trees and undergrowth with a good field of fire on Martians moving to bring their prisoners back to the saucer. A pair of Martians were detailed to pin him down but he kept their heads down with effective fire. He was soon joined in the copse by his dad, Willy. Uncle Si made his way into the swamp trying to reach Phil, but was pinned down by heavy fire.
           John Luke gives 'em hell!

Things were looking bad for the Earthlings, with two of the three women captured, two Robertsons badly wounded, two more back at the trucks and the rest under heavy fire. The Martians had only to return to their ship and leave with their two female prisoners to win. However, John Luke and Willy were still in the copse, resisting, and Cole was making his way up to support them. At this point, the Martian commander made a fateful decision. Instead of departing the planet with his mission accomplished he decided to crush the puny Earthlings who dared oppose him. He directed his landing party to move through the swampy area killing the two badly wounded Robertsons and the pinned down Uncle Si. From there the Martians would be able to finish off Willy and his sons in and around the copse of trees beyond. It proved to be a costly mistake as Willy and his boys laid down a withering fire on the aliens as they struggled through the swamp. Two of the Martians were badly wounded and the rest withdrew to their saucer and departed.
Never get into a land war in Asia and never scrap with Louisiana boys in a swamp

The next morning a pair of men in black suits arrived at Phil's house where the two wounded aliens were being held. Identifying themselves as Federal agents, the men in black promised a second team would follow up to take their statements regarding the encounter, took custody of the wounded Martians and drove away. When no follow up contact occurred, the family tried to find someone in authority to report the incident to. They were thwarted at every turn, finally took the hint and dropped the matter.  

Saturday, August 12, 2017

She wore a yellow ribbon

All of my gaming seems to be driven by things I enjoyed in my childhood. We are talking late 1950s and early '60s. One of the many subjects that captured my imagination back then was U.S. Cavalry versus the American Indians. Inspired by great movies like the John Wayne cavalry trilogy, it was just a matter of time before this period showed up on the wargame table.
Cheyenne war party hovers just out of reach of F Troop
So it was that Pete Complaining Bear, war leader of the Northern Cheyenne lured two troops of the 4th Cavalry into a running fight on the Great Plains of my basement. The rules we used were Yellow Ribbon, a set I picked up at a convention many years ago, knowing that someday they would get used.  
 Rough terrain slows my progress
As the Captain in charge of two troops of U.S. Cavalry, my plan was to close with the hostiles as quickly as possible to play on their sensitivity to casualties. This caused me to send one of my troops over a rough hill, which slowed their progress and turned them into a punching bag for the warriors firing on them from the plain. 
Amateurs talk tactics, professionals talk logistics
'A' Troop, 4th Cavalry deploys into line
As the Cavalry pressed forward in an attempt to close, the Indian war parties kept fading back before them, inflicting casualties as they went.
Cheyenne Dog Soldiers ford the river
Things were starting to look grim for the Cavalry. Both Troops had lost their officer and a third of their men, but their morale was holding up, at least for the time being. At last one of the two Cheyenne bands took a casualty, a badly wounded warrior. The Cavalry troop pressed in on them and they retired from the field in good order. The other Indian band also chose to withdraw, having achieved its objective of giving the Long Knives a bloody nose.
Gratuitous war party
The rules we used for the game were interesting in that they really brought out the different approach the two sides took to war. The cavalry could be given orders in pursuit of an overall plan, and they took a lickin' and kept on tickin'. The rules had the Indians approaching battle in a less coordinated way. If a band experiences an unexpected degree of success they might retire from the field to bask in their success. If they started to take casualties or lose a leader they might decide this just ain't their day and go home leaving other bands still fighting.  

Gotta have a stage coach
While the Yellow Ribbon rules did bring out the cultural differences in how the opposing sides saw battle, we found the level of detail slowed the game up. There is a copy of Pony Wars, another old but interesting set of rules. This set may be a better fit for our local gaming preferences. In a pinch, we might just make our own. If we do, the Cavalry will operate in the 'European' fashion of disciplined units following orders to carry out an overall plan. The opposing Indian bands will be much more independent, hitting hard or disappearing for reasons not understood by their opponents.  

 Forty miles a day on beans and hay


Wednesday, May 17, 2017

Home grown

Like many wargamers, I like to dabble a bit in rule writing. Sometimes these efforts end badly but occasionally one works out.  My new American Civil War effort may be a winner.
Bodeen's Confederate division enters the field
Control of the Dakota Tavern crossroads is the objective
The basic idea of the rules was to keep the mechanics of Move, Shoot, Melee, Morale and Command simple and then add in chrome to represent my thoughts on how the two armies were different.
Union brigades deploying from march column into fighting formations
Union commander Michael Hooker puts on a brave face
In my opinion, Confederate commanders and troops tended to be more aggressive, and morale somewhat higher than their Union counterparts, at least until the later war. Much of this may have been due to their usually fighting in defense of their own territory. The Union had advantages of their own. In my rules these are larger numbers and better long range artillery (more rifled guns).
 Confederate brigade in double line formation is hit front and flank
Confederate artillery deploying forward
In my setup the basic unit is a brigade composed of 6 stands of infantry, 4 of cavalry or 2 guns. For infantry and cavalry the formations are march column, double line and single line. Guns are either deployed or not. A typical division has 4 brigades plus an artillery brigade.
 Confederate brigades attempt to envelop the Union right
Union numbers begin to tell
My buddy Mike agreed to test out the rules with me. He had the bad manners to win the game but I forgave him because he spotted some minor fixable glitches in the rules. He is now rebasing his Franco-Prussian collection (which was in search of a rules set) to be compatible and talking about Maximillian's Greater Mexico - Caribbean Empire intervening in the Civil War. Bring it on, Austrian Puppet Boy!
Union division deploys from march column 
Confederates press on through heavy enemy fire


Thursday, April 27, 2017

All Games Great and Small

My regular gaming friends and I all have a preference for large games. These games are visually satisfying and give us an excuse to add to our figure collections that have been growing for 40+ years. The downside of this approach to gaming, aside from annoying the wives, is the games often don't get finished. That sort of thing probably doesn't bother normal, well adjusted gamers but it is a source of frustration to me.

 The most extreme example is a War of the Roses game Mike and I played recently. We had gamed the period on and off over the years using Fantasy Warrior rules by Nick Lund (check them out!). We enjoyed the rules and the period, and the armies had quietly grown way too big. In our most recent game we were having fun so, when time ran out we carried the game over to another day, and then another, and another. Each session was fun but also a lost opportunity to play a different game.
 
           My right wing, anchored on a village, prevails
Dismounted men at arms anchoring my center about to be surrounded
As an experiment, a game with Mike today was a small (dozen figures per side) French and Indian War skirmish. We began about 2:30 and finished 3 hours later with some time spent on side conversations, etc.
 
A game seems to have a better chance of making this blog if I win, and so it was with this skirmish. My colonial scouting party encountered Mikes Iroquois war party. We formed a skirmish line in a clearing in the woods. The line covered a gap between two patches of woods that most of Mikes warriors seemed intent on passing through on their way to engage us in melee. As they came through the gap, each warrior would fire his musket and then charge without pausing to reload.  In the event, my shooting caused enough casualties to discourage the Iroquois before their superior melee capabilities broke my morale.
The Iroquois charge through the gap
The colonials pour musket fire into the charging warriors
So are the days of gigantic games behind us? Um, no. For all their shortcomings, my friends and I enjoy them too much. On the other hand, it was nice to have a nice bite sized game brought to a conclusion in a relaxing afternoon. I suspect the occasional 'normal' size game will find it's way into the rotation. 


Saturday, December 31, 2016

Norman Invasion II, the Sequel


The burden of defending England in the great battles of 1066 was borne by a small part of her military strength. The great battles happened in quick succession and were decisive, leaving most of the English fighting men no opportunity to take the field against the invaders. One such contingent were the men owing service to Ealdorman Earwig of North Anglia. In peace and war this forgotten corner of England was left largely unmolested. However, in the spring of 1067 William, newly crowned King of England, was casting about for lands to reward his followers. One of his lesser Barons, Ralph of Amiens, called “Short Sword”, but never in his presence, was assigned the lands of Ealdorman Earwig, if he could evict the current occupant.
Ealdorman Earwig deploys his men

                            Norman foot take up position
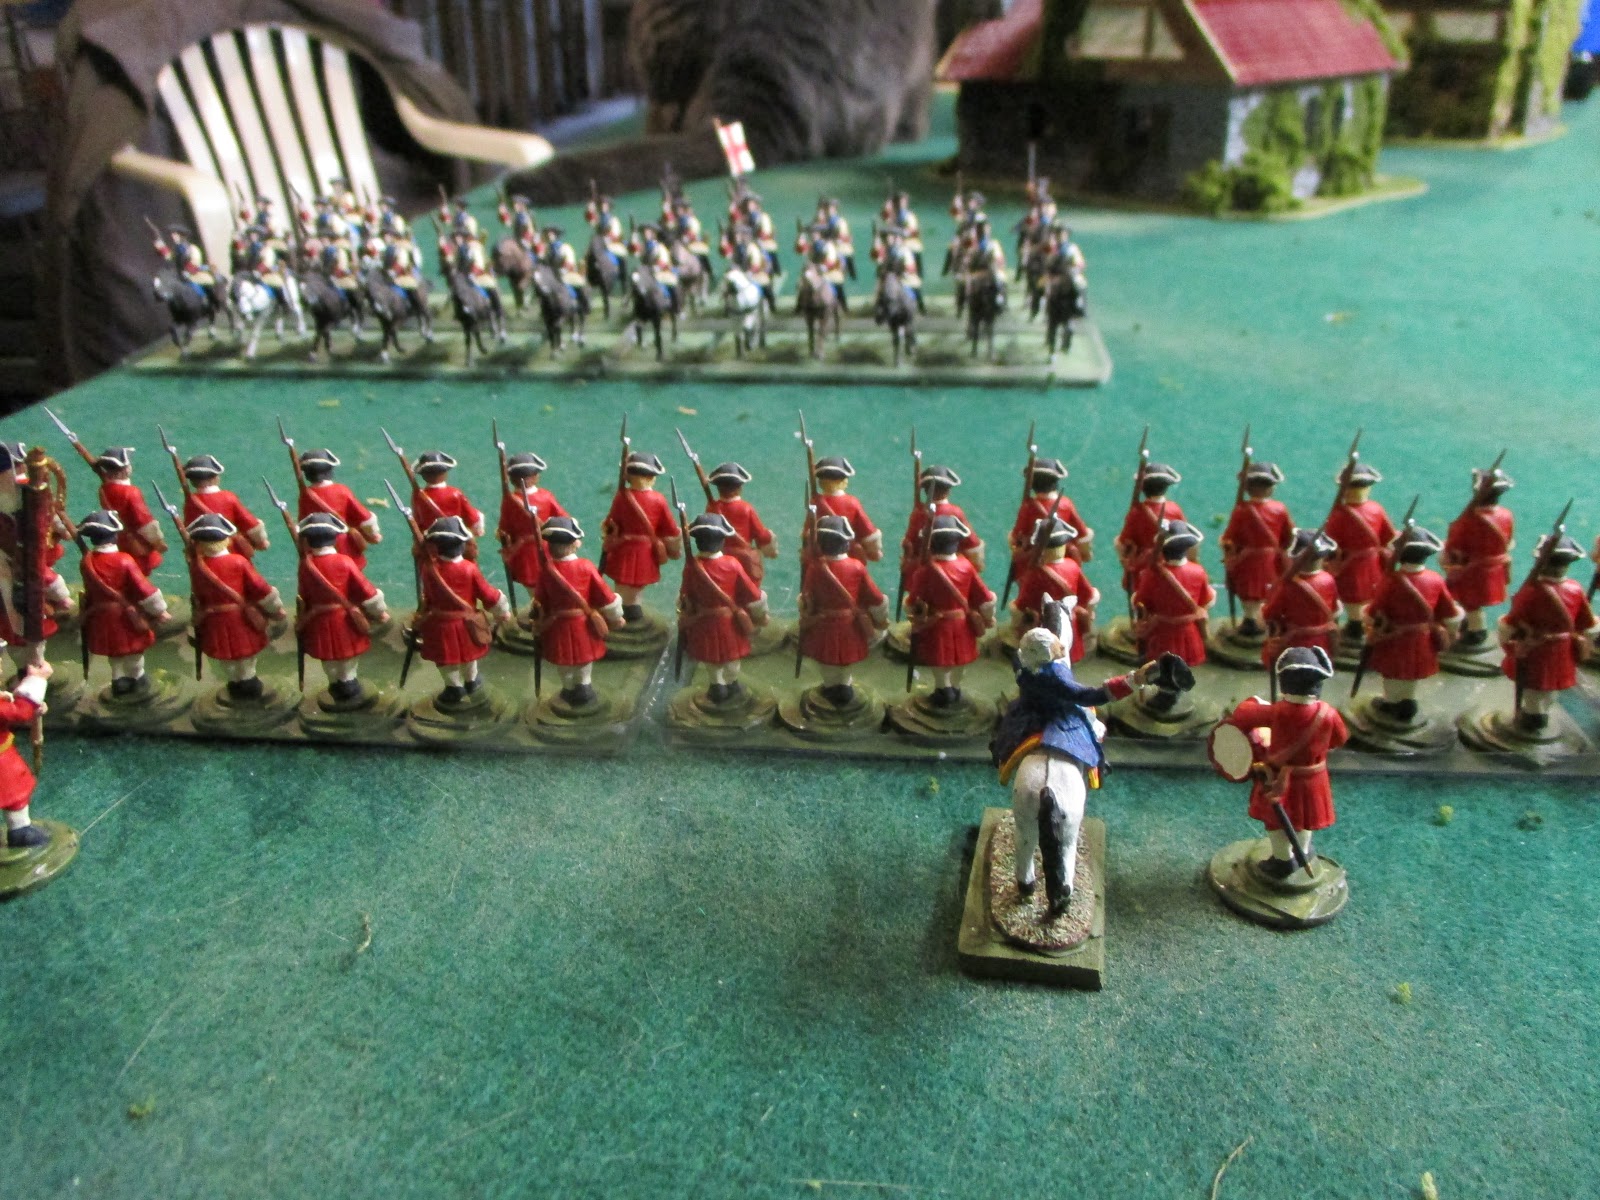
Ralph made his way north with his followers; 135 horsemen, 144 spearmen, 72 archers and 36 axmen. Soon after crossing into North Anglia he was confronted by the army of Ealdorman Earwig. The English force consisted of 432 men. A third of them were his housecarls, well armored and armed with the dread Danish long axe. The rest were the Fyrd, reliable men but armed with shield, spear and long knife only. They were, for the most part, unarmored. The ground between the two armies was broken by rough hills and scattered copses of oak. A bad place to fight for both sides, but the leaders were determined to settle the business then and there. The Normans formed up in three bodies with roughly equal numbers of horse and foot in each. The English slid down off their ponies and sent them to the rear. They then formed in three contingents with the housecarls evenly divided between them.
Stalwart Saxon Fyrdmen deploy
Ralph directed the infantry of his left wing to occupy a rough hill in a defensive stance while the horsemen of this contingent advanced to support his center. The center of the Norman host moved straight forward against the English line opposite them. The Norman right was assigned the honor of striking the decisive blow. The infantry on this side was directed to take the hill that anchored the English left while the mounted men swept around the enemy flank to roll up their line.
The Norman center deploys
The Norman left holds

In the event the slow moving foot of the Saxon right swung around to align with the Norman foot defending the hill on that side of the field. They shrugged off the ineffectual Norman archery and assaulted the hill as ordered. The fighting here was indecisive and the issue was settled elsewhere. The mounted Normans in this part of the field were so poorly deployed they played no part in the battle. They spent their time edging away from the advancing English in an effort to not be caught among the trees and cut up by their dismounted foes.
Norman Milites on the left embarrass themselves
The centers of the two armies engaged in a protracted and indecisive contest with first one side and then the other gaining some small advantage which never developed into a breakthrough. The Norman right fared better. The infantry element of this wing was sent forward according to plan to assault the English foot holding  the hill anchoring this flank. The housecarls on the summit were in no mood to give ground, and sent the attackers reeling back.
Housecarls hold the hill anchoring the English left
 At the same time the mounted Normans moved quickly around the English left and attacked a smaller force of Fyrd  posted behind the hill to prevent just such a move. The Fyrdmen resisted bravely but, against the relentless assault of the mounted Norman elite there could be only one end. The Normans rode over the defenders and on toward the enemy camp. The English right broke and fled the field. Earwig, seeing the writing on the wall ordered the rest of his army to withdraw and live to fight another day.
Norman right wing horse descends on Saxon Fyrd
Mike and I played this game of Big DBA to test drive the new Conquest Games Norman figures I picked up at the Fall In convention. These two armies seem to be a pretty good matchup, although too much terrain on the table kind of muddied the waters. It is a bit of a mystery to me why the English gave up after Hastings. They had vast reserves of manpower to draw on while the Normans would find it difficult to reinforce across the channel.

Saturday, December 17, 2016

Peticus, Dux Bellorum

The Warlord Ardo had broken the peace and crossed the border at the head of a Saxon horde. The King of Dumnonia directed his Dux Bellorum, Peticus to meet the invaders before too much damage was done. So it was that the two armies faced off among the wooded hills of the borderland. The Saxons were moving through the rough country carelessly when they found themselves confronted by the army of the Britons in battle array. Peticus had massed his horsemen on his left flank under his own command. His spearmen and archers would hold his center and right while the horse delivered the decisive blow.
                          The British gentry in arms
Ardo could see that his best chance of victory would be to strike the British center and right hard before the enemy horse had a chance to overwhelm his right.
The Saxons view the British center, bristling with spears
The Saxon right adopted a defensive posture, making what use they could of the terrain while their center and left rushed forward to break the British foot.
Peticus makes his final dispositions before the clash
 The combat began in the center. The Saxons threw themselves on the British shieldwall with wild abandon, and were sent reeling back with heavy losses. After this rough reception Saxon morale in the center was close to breaking. The Saxon left was rushing to engage their British opponents and their formation was somewhat broken up by the terrain and  the scramble. The first to engage was the Saxon leader and his bodyguard on that flank. To get at the British line he had to pass through a wooded copse, where he was engaged by a handful of British archers, who delayed his progress during this critical time.
The last ride of Peticus
Peticus had posted himself at the head of his bodyguard at the junction between his spearmen in the center and the massed horse on his left. He saw his target of opportunity, charged with his guards ahead of the rest of the horse, which was still deploying, and.......was dropped out of his saddle by a Saxon spear. His bodyguard dismounted, surrounded him and carried him from the field. The British army, dismayed at the loss of their leader withdrew from the field. The Saxons, for whom the battle had not been going well, were happy to let them withdraw unmolested.